TT364 Label Pricing and Printable Area for Buyers
30th Oct 2026
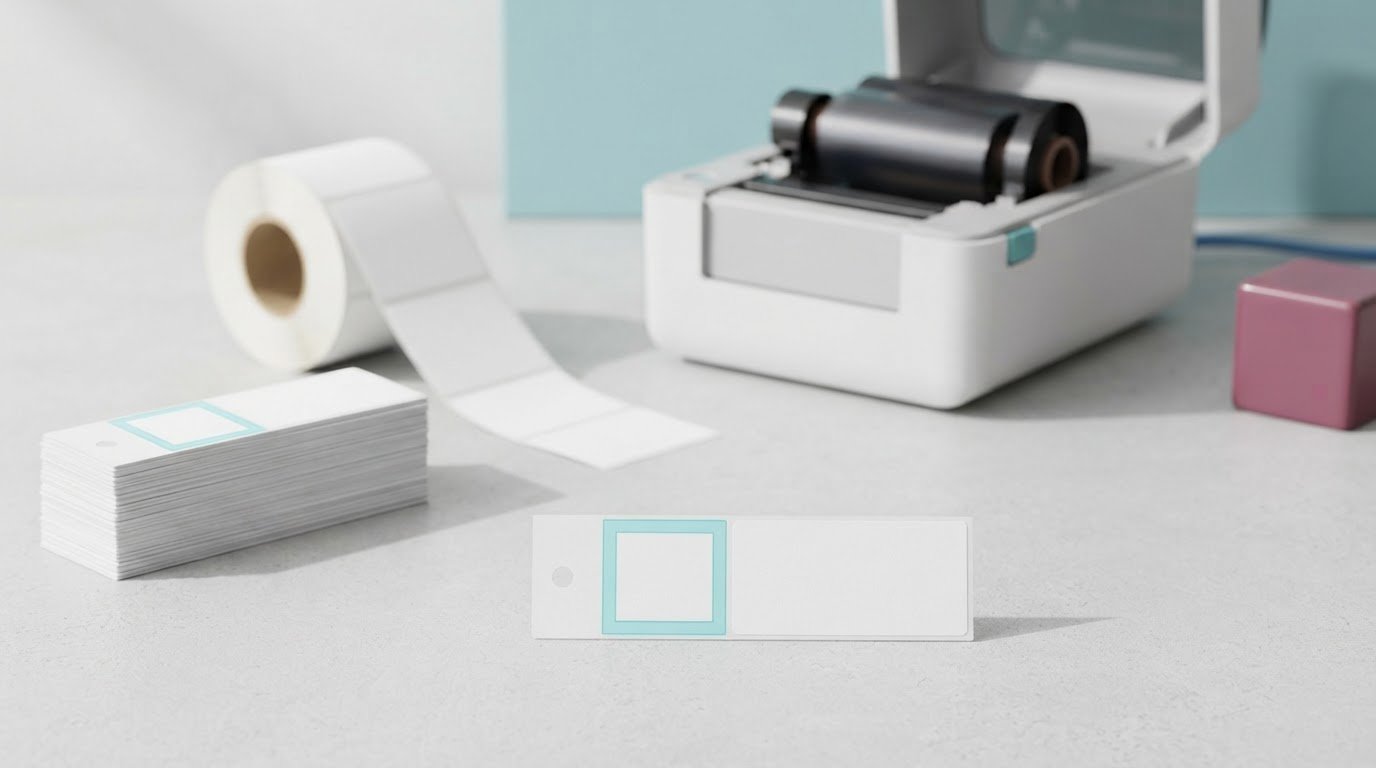
A TT364 jewellery tag measures 1 1/4 inches by 2 9/16 inches overall, with a printable area of 1 1/4 inches by 1 1/4 inches. For a TT364 layout, that difference matters: the full tag includes space beyond the area available for printing.
Dimensions are only one part of a buying decision. Buyers also need to understand how order quantities affect pricing and bulk discounts. This guide explains the printable area, pricing considerations, and details to weigh when comparing TT364 tags with other options. You’ll have a practical foundation for assessing whether this format suits your jewellery labelling workflow.
Key Takeaways
- Plan artwork around the printable area, not the tag’s full dimensions, to make the most of the available space.
- Compare order quantities and bulk pricing tiers to understand how purchase volume can affect your budget.
- Match the tags with a desktop thermal transfer printer and the appropriate resin ribbon for printing.
- Consider print legibility and tag handling when assessing potential issues; don’t assume a recall or defect without supporting information.
- Explore printer options from DuraFast Label Company Canada, including VIPColor and Afinia, when choosing equipment for your labelling workflow.
Label dimensions and printable area
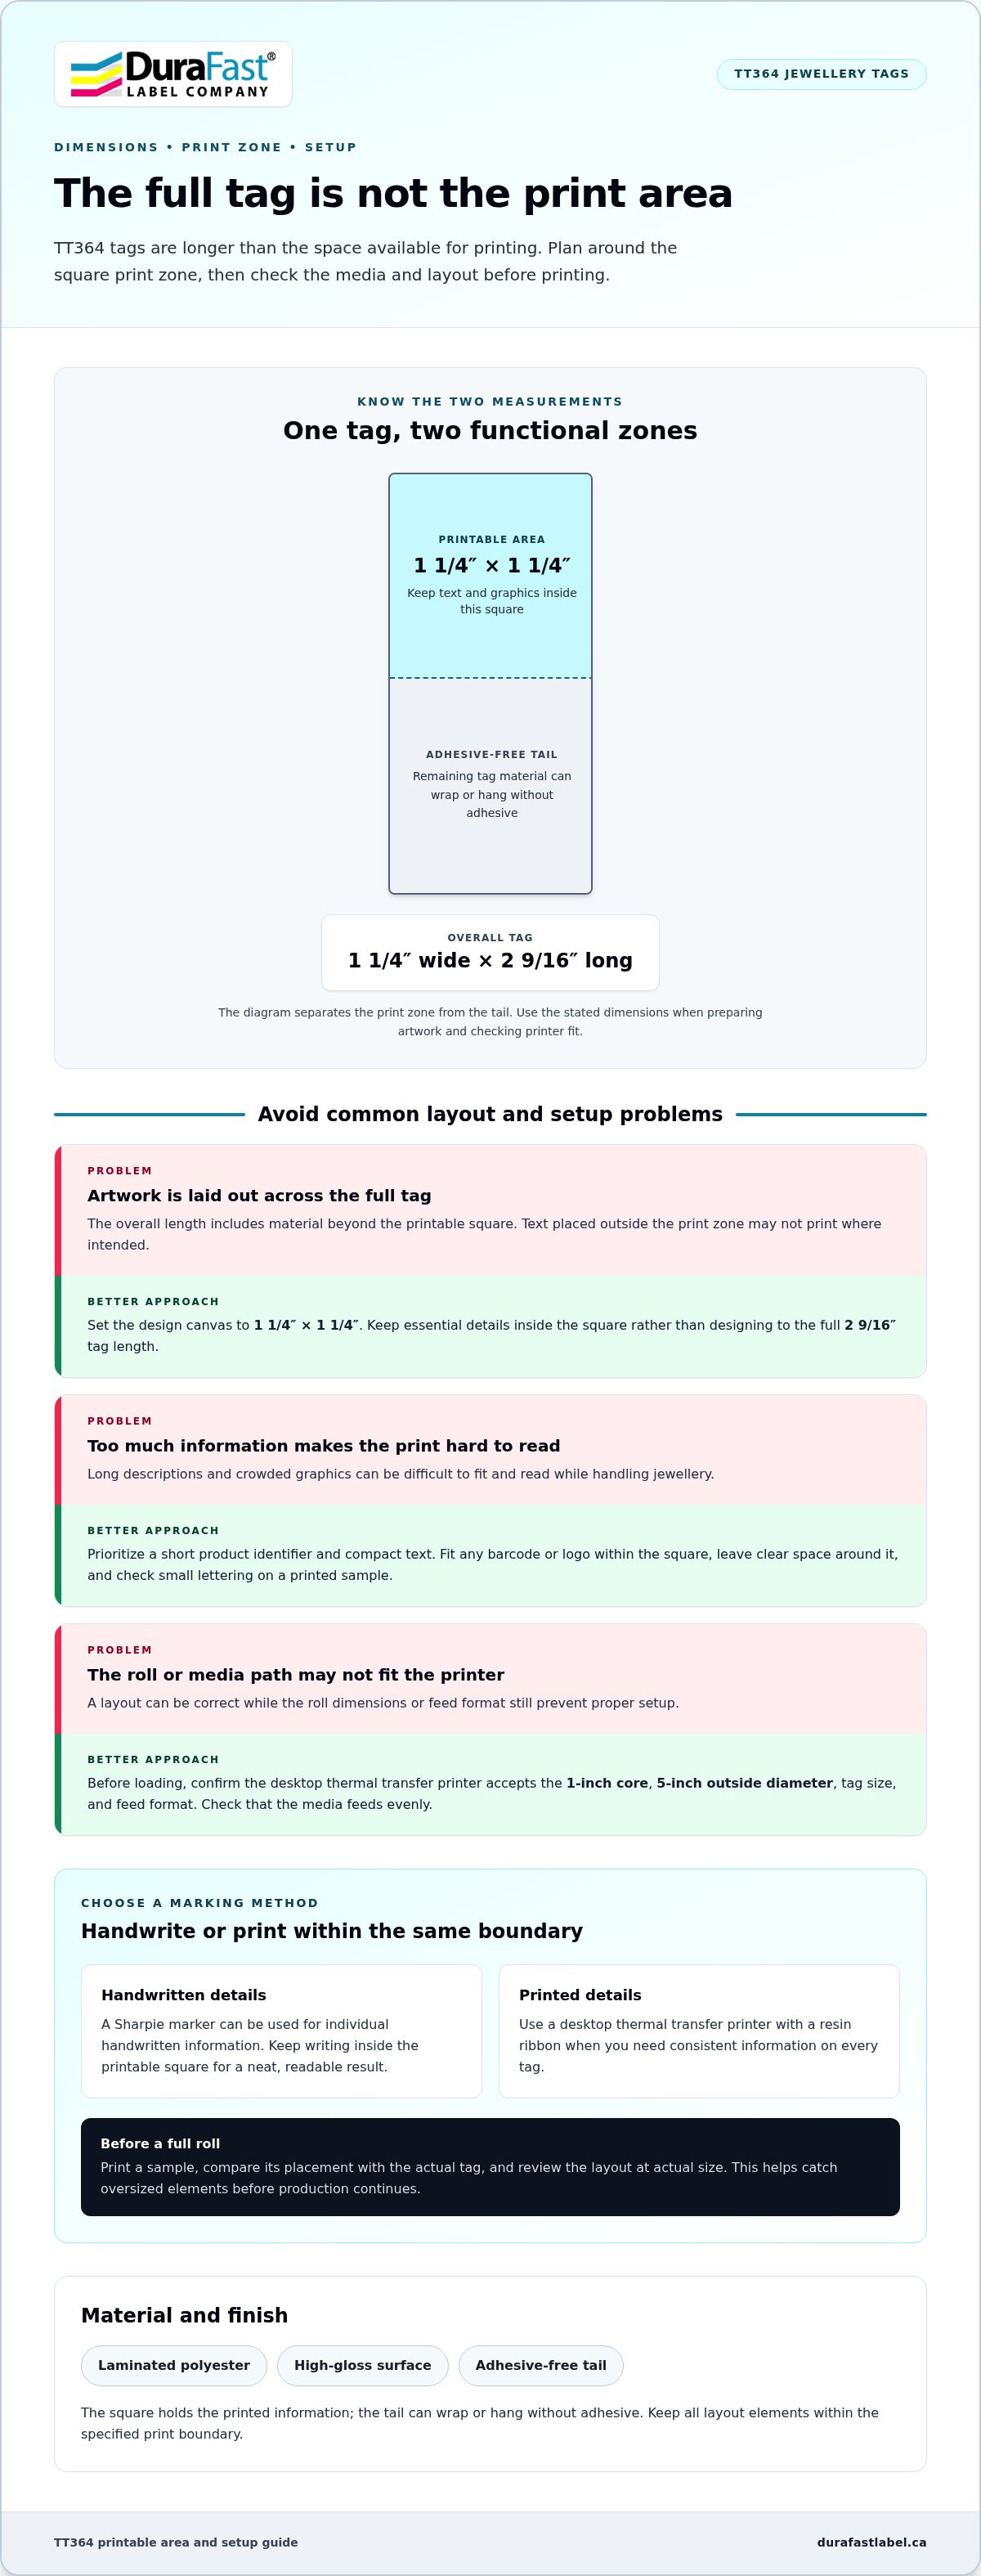
The TT364 jewellery tag measures 1 1/4 inches wide by 2 9/16 inches long overall. Its printable area is a square measuring 1 1/4 inches by 1 1/4 inches. The printable area covers only part of the full tag. Plan artwork around this square, not the outside dimensions, to keep important content within the print zone.
That distinction matters when laying out a ring label. The 2 9/16-inch length describes the complete tag, while the 1 1/4-inch square identifies where printing belongs. A design stretched across the full length could place text outside that area. Keep essential details inside the square and review the layout at actual size before printing.
Think of the tag as having two functional zones: the printable section and the remaining tag material. These labels are made from laminated, high-gloss polyester and have an adhesive-free tail. The tail can wrap or hang without adhesive, while the square holds the printed information. Keep all layout elements within the specified print boundary.
For example, a short product identifier and compact text are more practical than a long description. Check the smallest lettering on a printed sample, especially when staff must read details while handling jewellery. A barcode or logo also needs to fit within the 1 1/4-inch square. Leave enough clear space around those elements for a legible result.
- Overall tag: 1 1/4 inches wide by 2 9/16 inches long.
- Printable area: 1 1/4 inches by 1 1/4 inches.
- Material and finish: laminated polyester with a high-gloss surface.
- Tail: adhesive-free and separate from the printed information area.
Roll format also matters during setup. Check the roll’s quantity and outside diameter before planning printer setup. Allow room for the roll and printer, then check that the media feeds evenly. The printable dimensions guide the artwork; the roll dimensions determine how the media fits into the work area.
Before preparing a production file, set the design canvas to the 1 1/4-inch square printable area. Place only required text, identifiers, and graphics inside that boundary. Print a sample, then compare its placement with the actual tag. This sequence can catch oversized elements before printing continues through a full roll.
You can mark these tags with a Sharpie marker or print them using a thermal transfer printer. Choose the method according to whether you need consistent information on every tag or individual handwritten details. For printing, treat the square as the layout limit. For handwriting, keep the writing within the same area for a neat, readable result.
The TT364-POLY-LAM-3 tag is 1.25 inches wide and 2.56 inches long. Use those stated overall dimensions as a separate check from the square print boundary when preparing a layout, so the canvas is not mistaken for the full tag. The measurements describe the tag itself, while the printable area remains the guide for placing text and graphics.
How much does TT364 cost in Canada?
To compare tag costs in Canada, start with the quoted price per roll and the number of rolls needed. Each roll contains 4,000 tags, giving you a consistent quantity for comparing quotes. Divide the roll price by 4,000 to calculate the per-tag amount. For a TT364 purchase, this calculation helps compare order sizes without confusing the roll total with the cost of an individual tag.
To compare a smaller replenishment with a larger order, divide each total by the number of tags to find the unit cost. A larger order makes sense only if the quoted total, storage needs, and expected use align. A lower per-tag cost may still require more upfront spending and leave you managing extra inventory.
Bulk discounts depend on the quoted quantity breaks. Compare the actual price at each order quantity rather than assuming a larger purchase automatically earns a discount. Record the number of rolls, price per roll, and order total together. This makes it easier to see whether a discount affects your decision and to explain the comparison.
- Roll quantity: Estimate how many rolls your operation needs.
- Quoted unit: Confirm whether the price applies per roll or per tag.
- Quantity break: Compare the quoted order quantities and totals.
- Usage plan: Relate the order size to expected consumption.
A simple comparison table can clarify the options. Create a row for each quoted quantity and include rolls ordered, tags represented, price per roll, and total order price. Calculate the per-tag cost consistently across every row. If a quote uses a different quantity basis, convert it to a per-roll or per-tag figure before comparing.
For Canadian budgeting, keep the quote currency and any separately listed charges clear in your records. Compare equivalent quotes: a price per roll cannot be compared directly with a total covering several rolls. For a TT364 order, base your decision on the actual Canadian-dollar quote for the quantity being considered, rather than an unverified currency conversion.
Order size also affects inventory planning. Match the number of rolls to expected demand, storage capacity, and replenishment plans. A business using tags steadily may assess a larger order differently from one buying for occasional jewellery runs. Documenting quantities and totals helps purchasing teams explain their decision and plan future orders.
Before ordering, confirm that each quote covers the same tag format and quantity basis. Use the quantity per roll as your common reference, then weigh the total commitment against your purchasing needs. This makes bulk pricing easier to evaluate without relying on a discount label alone.
What are the instructions for using TT364?
Use these tags with a desktop thermal transfer printer and a resin ribbon. The roll has a 1-inch core and a 5-inch outside diameter. Confirm the printer can accommodate both dimensions before loading the media. The printer’s media path must also accept the tag’s overall size and feed format.
Prepare the printer in a few deliberate steps:
- Check that the printer is designed for thermal transfer printing.
- Confirm its roll holder accepts a 1-inch core and the roll’s 5-inch outside diameter.
- Load the tags according to the printer’s media-loading instructions.
- Install a resin ribbon compatible with the printer and its print settings.
- Set up the label layout and print a test tag before a larger run.
Use the tag’s 1 1/4-inch square printable area when setting the layout. Keep text and graphics inside that boundary. A compact identifier, short description, or small logo is more suitable than a long product description. Check the test print against an actual tag, because the full tag length is not the printable area.
During testing, check alignment and legibility. Confirm that printed content stays within the printable square and does not extend onto the adhesive-free tail. If the print is misaligned, adjust the media position or printer layout settings and print another sample. Change one setting at a time so you can identify what fixed the placement.
You can also write on these tags with a Sharpie marker. This works when each tag needs an individual detail rather than consistent printed information. For example, a jeweller could print a standard identifier and add a handwritten note when needed. Keep the writing within the printable area for a clear, organized result.
Handle the laminated polyester tags by their edges during loading. Keep the roll seated evenly so the printer feeds the tags without skewing. The supplied roll contains 4,000 tags, so a short test run helps catch layout or feed issues before continuing through the roll. Follow the printer manufacturer’s instructions for ribbon installation and media loading.
For repeat orders, save the working layout and printer settings after confirming a successful sample. Record the chosen ribbon type, media dimensions, and placement settings with the job file. Those details make it easier to reproduce a consistent result when loading another roll. The TT364 format is intended for thermal transfer printing, while handwritten marking remains an option for one-off details.
What are common problems, risks, or recalls associated with TT364?
Common practical issues include printer compatibility, media feeding, and unclear print results. These polyester tags are designed for thermal transfer printing and require a resin ribbon. Using a printer setup intended for a different media type or ribbon can produce poor results. Before printing a full roll, confirm the printer is in thermal transfer mode and set up with the correct ribbon.
Feeding trouble can start with an unsuitable roll holder or incorrect loading. The roll has a 1-inch core and a 5-inch outside diameter. Check that the printer accepts both dimensions, then follow its media path instructions. If tags track sideways or stop feeding smoothly, pause the job and inspect the roll position before changing print settings.
Print placement is another likely source of waste. The available print area is 1 1/4 inches square, even though the tag measures 1 1/4 inches by 2 9/16 inches overall. Text placed outside that square may fall on the unprintable portion. Print a sample, compare it with the tag, and adjust the layout before continuing.
- Faint or uneven printing: review resin ribbon installation and printer settings.
- Misaligned content: check media loading and keep artwork within the printable square.
- Feed interruptions: confirm the 1-inch core fits correctly on the holder.
- Unclear handwriting: test the Sharpie marker on a sample tag first.
The high-gloss laminated polyester surface can affect the appearance of handwritten information. If staff use a Sharpie marker, test one tag first and check that the writing is easy to read. Avoid handling the written area until the mark is legible. For printing, use the specified resin ribbon; switching ribbon types without testing can compromise the result.
Focus quality checks on the tag’s intended use. For example, make sure a short identifier is readable and fits fully within the printable area. Check that the adhesive-free tail remains clear when the tag is attached to jewellery. These checks help distinguish a layout problem from a media-feeding or ribbon issue.
A recall is separate from routine printing defects. If a supplier or manufacturer issues a notice, compare its product description and identifiers with the tag packaging and purchase records. Keep the roll packaging and order details available, and follow the notice’s instructions. A printer jam or a single misprinted tag is not evidence of a recall; document the issue and assess its cause first.
For consistent inspections, keep a sample from each new roll and record the printer settings used. Compare later output with that sample for placement, legibility, and feeding. This record can help identify whether a change came from the media, ribbon, printer setup, or artwork.
What alternatives are comparable to TT364
For jewellery and ring tagging, TT306 and TT307 are named alternatives to compare. Their product names identify related label options, but a shared category doesn’t establish identical dimensions, materials, roll formats, or printer requirements. Compare the actual specifications against your current setup before choosing a replacement. That prevents a name-based comparison from becoming an assumption about fit.
Start with the tag’s purpose. Does it need to identify a ring, carry a short product description, or accommodate a logo? Compare each option’s usable print area with the information you need to show. For example, a barcode-and-text layout may need more space than a simple identifier. The printable area, not just the overall tag size, determines what will fit.
Printer compatibility is another deciding factor. Check that the alternative uses the same printing method, and compare its roll and core dimensions with your printer. If your workflow uses thermal transfer, verify the ribbon requirement for that specific tag. An option suited to a jewellery counter may still require a different printer setup or media configuration.
- Compare the purpose: match the label to the jewellery item and identification task.
- Check the layout: compare printable space with text, logo, or barcode needs.
- Confirm printer fit: review printing method, roll size, and core dimensions.
- Assess handling: consider how the tag attaches and how staff read it.
Use a side-by-side comparison sheet for TT306, TT307, and your existing tag. Record the overall dimensions, printable area, material, finish, roll quantity, core size, and compatible printing method. These details make the comparison practical without treating product codes as technical specifications. If one field affects your workflow, make it a required selection criterion.
For example, a jeweller printing a compact identifier should prioritize print area and legibility. A store handling several tag styles should also check that each roll works with its existing printer. If an option has a different core size or feed format, account for the setup changes before deciding. These criteria help distinguish a suitable alternative from a product that merely belongs to the jewellery-label category.
Choose TT306 or TT307 only after comparing their specifications with the task and equipment. Keep the label’s actual use central: attachment style, information space, printer compatibility, and staff handling. A short sample run can reveal layout or feed issues before regular use. This method supports a clear comparison while leaving room to select the format that best fits your jewellery workflow.
DuraFast Label Company Canada: VIPColor Label Printers
DuraFast Label Company Canada can help you compare printer options when your labelling needs extend beyond thermal transfer jewellery tags. Its VIPColor Label Printers use Memjet technology and dye inks, making them a different printing approach from resin-ribbon printing. They aren’t a direct substitute for printing TT364 tags, which require a thermal transfer printer and resin ribbon.
If you’re also producing colour product labels, consider whether a VIPColor printer fits that separate workflow. For labels exposed to water or condensation, check whether the printer and ink are suitable for that environment. DuraFast also offers Afinia, Toshiba, and Godex Label Printers, giving you options to assess against your other labelling requirements.
For help choosing printer options for your jewellery-tag setup, contact DuraFast Label Company Canada.
Choose the next step for your labelling workflow
Use your next purchasing decision to consider jewellery tagging alongside any broader product-labelling needs. Keep the requirements distinct: a printer for coloured product labels serves a different purpose from equipment for jewellery tags. This distinction can help you prioritize equipment, supplies, and workflows without expecting one setup to handle every task.
For colour product labels, DuraFast Label Company Canada offers VIPColor, Afinia, and Primera label printers. Consider the label types, print conditions, and production workflow you need to support, then list any equipment questions that remain. A clear list helps focus the next conversation and compare options against your actual operating needs.
Whether you’re refining your jewellery-tag process or considering equipment for another labelling job, the goal is a setup that fits the work. Contact DuraFast Label Company Canada to discuss your label printer requirements and take a practical next step with your TT364 workflow.
Frequently Asked Questions
What does TT364 refer to?
TT364 refers to a jewellery and ring tag format used to identify merchandise, rather than a printer or printing process. For example, a jeweller can use a tag to keep an item’s identifying information with it during handling or display. The code distinguishes this tag style from other jewellery-tag options. Its practical fit depends on the information you need to show and the way staff handle tagged items.
Is TT364 a product, model number, form, or service?
It’s a product identifier for a physical jewellery tag, not a form, service, or printer model. The code helps distinguish the tag from other label formats, such as TT306 and TT307. For purchasing and inventory records, use the full product description alongside the code. That helps staff avoid confusing a tag identifier with the model number of the desktop printer used to print it.
Who makes or issues TT364?
The named commercial designation is Arch Crown TT364-POLY-LAM-3, identifying an Arch Crown tag product rather than a government-issued form. The “issued by” wording therefore doesn’t apply in the way it would for an official document. For ordering or matching records, compare the complete product designation and tag requirements, not just the abbreviated code, since a code alone may not describe every product detail.
What are the specifications or details of TT364?
The tag is laminated polyester with a high-gloss finish and an adhesive-free tail. A logo is available in 8 colours, offering a visual identification option beyond text. The label is designed for desktop thermal transfer printing and requires a resin ribbon. These details help distinguish it from ordinary adhesive labels, especially where the tag’s tail and logo treatment matter to jewellery display or item identification.